Pages

Thursday, April 21, 2016

Festival Fun

I love festival makeup. You can be as creative or as natural as your heart desires. It really is a free-for-all and anything goes, so have fun with it!


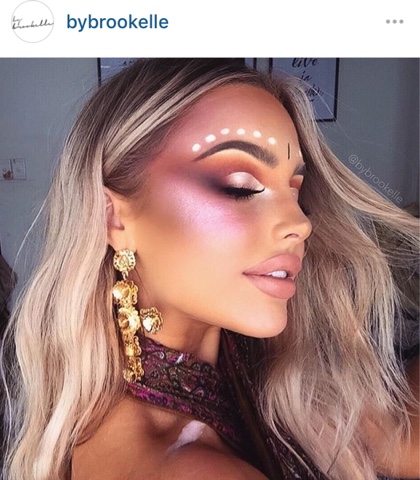
This image has been going viral on social media this week. The stunning Brookelle McKenzie (@bybrookelle) absolutely stayed her festival creation, not to mention her Instagram feed of perfection.


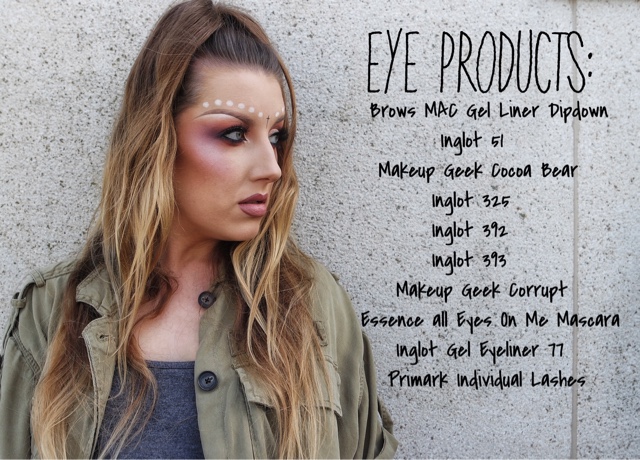
So I thought I would try and re-create my own version of this look. 


I may have had to scrub this all off to go take the dog for a walk. I think the neighbours would have given me a few side eyes with this one. 


Wednesday, April 20, 2016

Loving Layouts


When it comes to technology, I just have to look at something for it to break. I have always hated the look of my blog and have spent countless hours trying to re-do the layout. These house were completely wasted as I simply didn't have a clue what I was doing. 

I found Kotryna Bass Design online as she was used by another blogger that I follow and I decided to purchase one of her templates. There are lots of beautiful layouts to choose from at a really affordable price for both Blogger and Wordpress. You receive the template immediately after payment and it comes with instructions on how to install it yourself. If your anything like me though and you find computer stuff like reading japanese symbols, then she also offers a free installation service which is completed within 24 hours.

I couldn't reccommend Kotryna enough. She was very helpful and she was happy to answer any of my questions. I couldn't be happier with my new layout.

Monday, April 18, 2016

A Little Lace Number

Has anyone else been lusting over the new lace appliqué lingerie trend?  I'm in love! Some of the most intricate lace lingerie with a beautiful feminine touch but some of them come with a hefty price tag that I simply can't afford. I couldn't believe it when I found this little gem in Penneys. The best part? It is only €8! 


Saturday, April 16, 2016

Coachella Dreaming


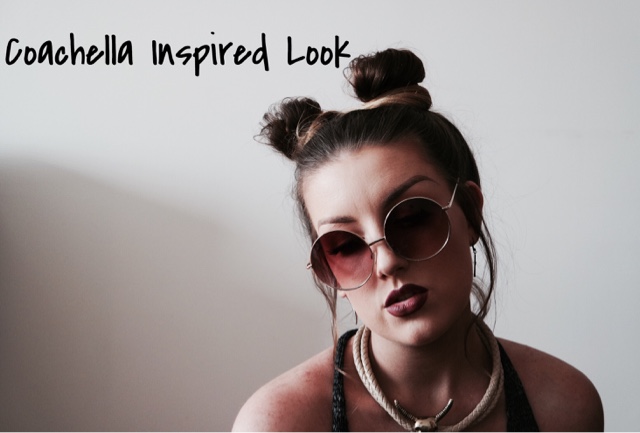
Not all of us are going to be lucky enough to go to the world famous Coachella festival in the US but at least we can dream. The teepees, the ferris wheel, never mind the beautiful people. It looks like the festival to be at. 
So while I'm stuck here in rainy Ireland, I thought I could at least try and look the part. 


With this kind of look, I wanted to keep the complexion soft and dewy. I mixed in a pea sized amount of MAC Strobe cream in with my moisturiser before applying my base. I applied my foundation with a damp Real Techniques beauty blender sponge so the foundation can be absorbed by the skin rather than just sitting on top. This gives a more natural effect yet you can still achieve a full coverage if this is what you like. 


A small bit of powder highlight on the top of my cheekbones using MAC Soft & Gentle and a mix of Pink Swoon and Peaches Blush also from MAC on the apples of the cheeks. You don't need to use two blushes, mixing the two just got me the colour I wanted to achieve, but any peachy toned colour will be fine.


I wanted to keep the eyes simple. If you were at a festival the last thing you need at night in a tent is to remove gel eyeliner, that's just asking for morning panda eyes. 
I used Makeup Geek Creme Puff Matte eyeshadow as a base all over the eye with a big fluffy brush. Using Deep Skin from the same brand, I applied this to the socket of the eye with an Inglot 6SS blending brush. With a Sigma E25 brush, I applied Caramelised to the outer corner of the lid and winged it out slightly. I filled in my brows using MAC Dirty Blond Gel Creme and a 31T angled brush from Inglot.


Add a coating of Soap & Glory Thick & Fast Mascara to the lashes, any mascara will do but don't apply too much as your false eyelashes won't sit right if there is too much mascara. 
I applied the short individual lashes from the Primark range all along the lash line with one or two of the longer length on the ends. I personally don't apply mascara to false lashes as I think they can clump together very easily and look really unnatural but to each their own. 


I used Inglot 57 lip liner to line the lips and fill them in. I then used Kiko lip liner in 309 in the centre of the lip to add brightness giving the illusion of a fuller lip. This changes the tone of colour to a more plum colour.
I have used two lip liners here to achieve this and to give the appearance of fuller lips. This is not necessary, if you just want to use the one colour that is fine. 


Thursday, April 14, 2016

Nursery Inspiration

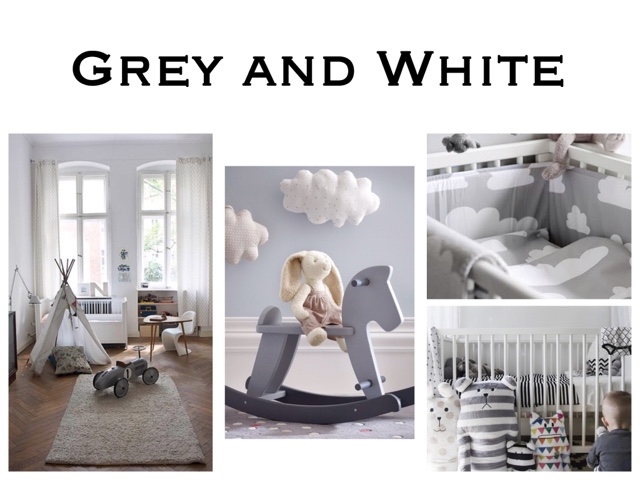
In a couple of months we will be moving into a new place so my days have been filled scrolling through Pinterest looking for inspiration. Here is a few inspiration boards on what I am thinking for Harley's room.


Wednesday, April 13, 2016

Do I, Don't I?

It's a tough decision whether or not to give your baby a soother or not, and if you do, then when?

There is a lot of pressure out there when it comes to parenting and everyone definitely wants to give their two cents on what is right and what is wrong. At the end of the day, they are only trying to help but you have to learn to take people's opinions with a pinch of salt (or a bucket). You have to do what you feel is right for you as a parent to your own child.

We have been very lucky with Harley. She rarely cries, only wakes once most nights and is quite content being cuddled by anyone who holds her without making strange (I have every finger and toe crossed that it stays this way, I know babies like to change things up as soon as you think you have a routine established). Because of this, I haven't had to start her on the soother as a form of comfort. To me, this worked great as I felt that could lead to tantrums if she dropped her soother or waking up if she was using it to help her sleep. 


However, the past week Harley has discovered her hands. Every time I turn around, there she is, hand in mouth and dribble everywhere (I think she is beginning to teeth). 
Harley has been on her soother a week now and she loves it. I have to admit, she looks super cute with it.

Tuesday, April 5, 2016

Enough with the Excuses

I think it's time to stop with the excuses. Yesterday was officially day one of a new healthy diet and a solid exercise routine, hopefully three times a week. 

I had a list of excuses not to be healthy so that I could happily indulge in everything that I am not allowed to have. My list consisted of:

1. I'm still recovering.
2. I will establish a routine with the baby and then I will start a diet.
3. It's selfish to focus on me, concentrate on the baby and pass me the chocolate.
4. It's March, there is no point in starting a diet when Easter is at the end of the month. I need to train my stomach with small doses of daily chocolate to prepare for the mother-load on Easter morning.
5. Cream eggs.
6. It's the 1st of April, I'm going to start. Hold on, the 1st of April is a Friday - nobody starts a diet on a Friday.
7. I've run out of excuses. Shit, I'm going to have to work out.


I am easing myself into the physical side of things because I am aware I have to be careful as you can really harm your pelvic floor if you go too hard or too heavy too soon. 
Diet will be tough for the first few days. No more sugar, only home cooked meals, cutting down on carbohydrates and lots of fruit and vegetables.

Day 2: Can't walk.

Wish me luck!

Friday, April 1, 2016

Bye Bye Baby Bump

After baby arrives, it can take a few days, even a few weeks to settle in to your new way of mom life. When Harley was around three weeks old and we had established ourselves in to some sort of a routine, it finally hit me that my bump was gone. Although I haven't shifted the inevitable baby pouch just yet (she is eight weeks old at the moment and let's face it, it was Easter last week), it suddenly hit me that I no longer had my giant watermelon baby bump.


It's a strange feeling. You're so in love with your new arrival, and so happy hat they are here and healthy, but I can't help but miss her little kicks inside of me.


By now I'm happily getting a hold of things and everything has gently clicked in to place. I am starting to know her hungry cries from her sad cries, her happy smiles from her 'I just pooped and it's all up my back' smiles and I have finally mastered the art of doing the household jobs with one hand. Just a heads up, babies have impeccable timing. Harley has a super power of knowing exactly when to wake up just as my dinner is ready. I suppose cold dinners aren't such a bad thing as long as she is happy. 


It's all a learning curve and we are learning together every day. We'll get there one day. After all, nobody is perfect. 

Tuesday, January 19, 2016

A Diamond in the Rough

Some call it nesting, others call it boredom, I however use it as an excuse to get a bit messy, a bit creative and an excuse to create something unique for my little pudding on the way.


In our apartment, we have two bedrooms, the master bedroom of course and the obvious makeup turned wardrobe room. No? Just me? Don't ask me how I managed to convince my other half that I could turn the spare room into a sanctuary for my cosmetic addiction but he's the best and he politely agreed. 
When we found out we were expecting a baby in early 2016 we were over the moon. We initially weren't going to set up a nursery room for the little tot as she will be spending the first few months in our bedroom in a co-sleeper but after countless nights flicking through Pinterest I couldn't help myself. It was time to give up my makeup room, well.....at least share?

I already owned the Hemnes 6 drawer dresser from IKEA in a black/brown shade in my old room in my family home. We decided it would be perfect to store all our little ones bits and bobs but I knew I wanted to do something special to make it perfect. Here's how I accomplished this DIY Dresser Makeover.


First of all, make sure to protect any other furnishings that are in the room. We have carpet in both of our bedrooms so I made sure to have all areas covered in case of any splash or spilled paint. 
Remove the hardware from the dresser. Most doorknobs just twist out. Store these somewhere safe as we are going to get to them in a bit.


Start off with a good quality undercoat. You may need to lightly sand down your furniture before this step but I didn't feel this dresser needed it. I applied 3-4 coats of this undercoat to the dresser as the start colour was so dark. If you are using a lighter toned wood, you may not need as much. I made sure to leave each coat to dry over night as I found it would begin to lift if you went in with more product too soon. 


If you do experience any lifting of paint, do not worry. Allow it to dry overnight and go in with a very fine sand paper like the one in the picture above. This will smooth out the texture and allow for another coat to glide on over this layer. 


Once your happy that your primer is almost opaque, you can then go over with a layer or two of standard white paint. I used matte white, however most people will go with a gloss finish on furniture (I just had other matte items to match it to in the room). 


Once dry, I wanted to design the front with a geometric diamond design. I mapped out the space with a 1 inch thick roll of masking tape. I then edged this design with more masking tape so when I removed the centre strip, it would leave me with a stencil to fill in with my chosen colour. To make things even easier and to avoid making a irreversible mistake with pink paint, I marked the middle tape (where I wanted the pink to be) with a pencil saying 'pink'. 


Make sure when removing the masking tape to do so slowly as you could lift the paint underneath. Remove the masking tape marked 'pink' and fill in this shape with whatever colour you wish. As we are expecting a little girl, I went with a pale pastel pink. After filling in your chosen colour, make sure to remove the leftover masking tape before the paint dries as otherwise it will cause your design to chip.


Now back to your hardware. Make sure to do this outdoors as most spray paints are quite messy and are much stronger in smell. Hold your spray can around 30 cm away from the doorknobs so that they get an even coat of paint. Allow to dry outdoors for an hour or two and then turn and spray again to make sure the full part is coated. I chose to spray mine gold. Allow to dry over night.


Reattach your doorknobs onto each drawer once everything is fully dried. And that's it, your done. Now time to fill those drawers with the cutest baby clothes and wait for little madams arrival.


Feel free to ask me questions. 

Lots of Love
Jen x